
A pricing table is a well-structured representation of products and services along with their corresponding prices and features. It allows customers to compare different pricing plans and choose the one that suits them.
Les bloc de table par défaut de WordPress ne dispose pas de nombreuses fonctionnalités avancées. Il ne vous permet pas de créer des tableaux de prix complets. Vous avez besoin d'un plugin de construction de tableaux comme Tableberg pour créer de superbes tableaux de prix.
Vous pouvez créer des tableaux de prix centrés sur la conversion même avec sa version gratuite. Dans cet article, nous allons vous montrer comment créer un tableau de prix dans WordPress en utilisant le plugin Tableberg.
- Méthode 1: Choisir un modèle de tableau de tarification
- Méthode 2: Créer un tableau des prix à partir de zéro
Créer de belles tables
Avec l'éditeur de blocs

Choisir un modèle de tableau de tarification
Le plugin Tableberg est livré avec quelques des modèles de tableaux de tarification préétablis. Vous pouvez commencer tout de suite en choisissant l'un de ces modèles.
Étape 1 : Installer et activer le plugin Tableberg
Aller à Plugins > Ajouter un nouveau plugin. Type Tableberg dans la boîte de recherche. Installer et activer le plugin tel qu'il apparaît ci-dessous.

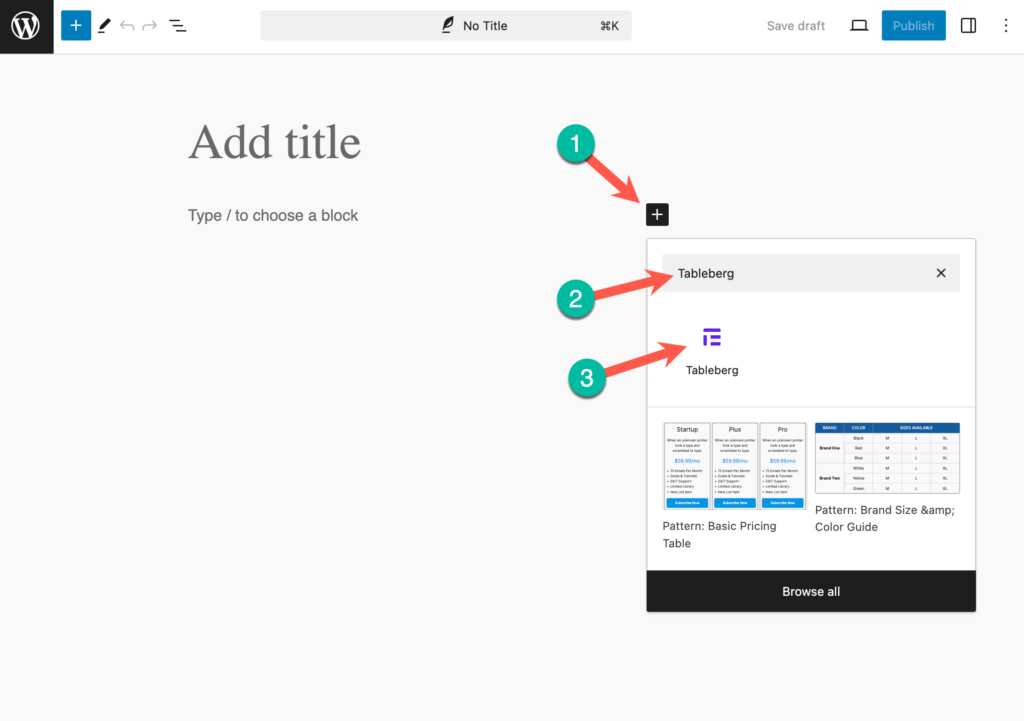
Étape 2 : Ajouter le bloc Tableberg à votre article ou page
Ouvrez l'article ou la page où vous souhaitez créer le tableau des prix. Cliquez sur l'icône + et recherchez "Tableberg". Cliquez sur le bloc Tableberg pour l'insérer.
Étape 3 : Choisir une table préfabriquée
Maintenant, si vous le souhaitez, vous pouvez créer une table à partir de rien. Je vous montrerai cela plus tard.
Voyons d'abord l'option des tableaux préconstruits. Une fois que vous avez inséré le bloc Tableberg, cliquez simplement sur "Tableaux préconstruits".

Une bibliothèque de modèles s'affiche. Sélectionnez la section "Tableau de tarification" et choisissez un modèle de tableau de tarification.
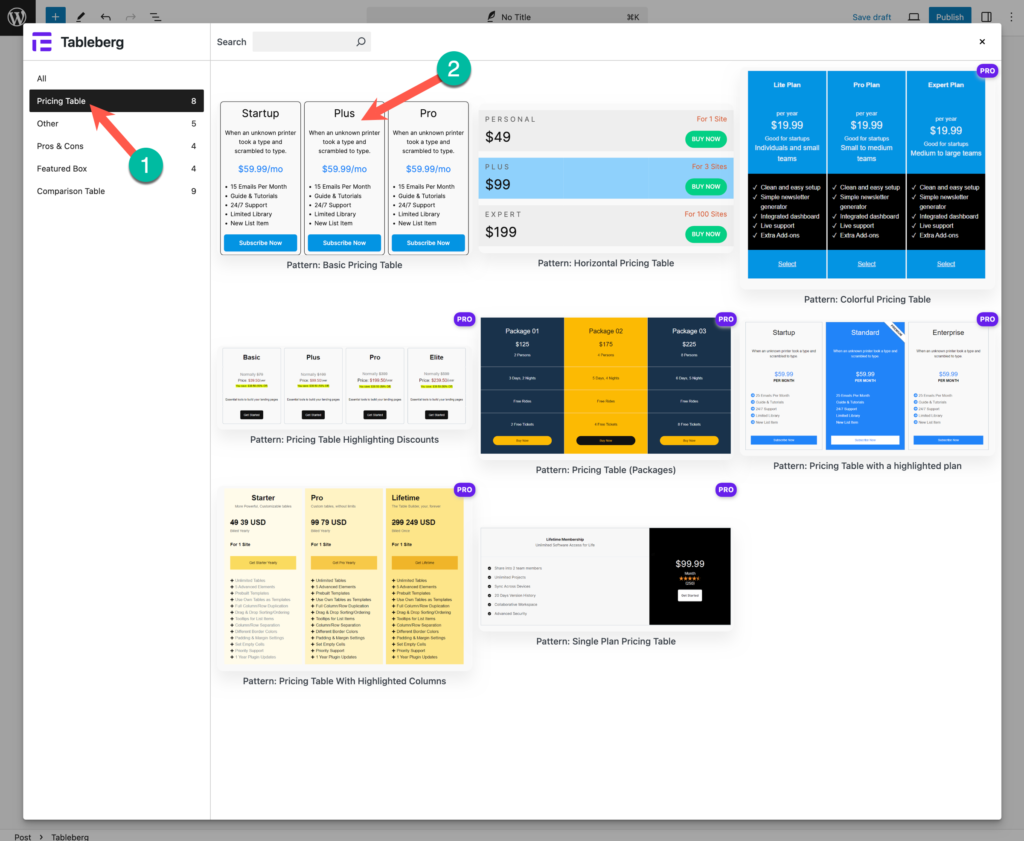
Le tableau sera inséré dans l'éditeur.

Étape 4 : Personnaliser le tableau
Sélectionnez le bloc entier en cliquant sur l'icône Tableberg, puis cliquez sur l'icône Paramètres dans le coin supérieur droit. Vous pouvez personnaliser le tableau à partir de là.

Créer un tableau des prix à partir de zéro
Vous pouvez également créer un tableau à partir de zéro.
Étape 1 : Choisir le nombre de colonnes et de lignes
Une fois le bloc Tableberg inséré, définissez son numéro de ligne et de colonne. Toutefois, vous pouvez augmenter ou diminuer le nombre de lignes et de colonnes après avoir créé le tableau, selon vos besoins. Mais pour l'instant, nous choisissons une ligne et une colonne de 4*4.

As you add lots of content, you may need more space within the table cells. So, it’s better if you increase the table width. Select the entire table by clicking the TableBerg icon three times on the toolbar.
Vous obtiendrez le Onglet Paramètres appearing on the right sidebar. Under the settings table, you’ll find the Largeur de la table option. Increase its width as you need.

Étape 2 : Ajouter des titres aux colonnes du tableau
Add suitable titles to the table columns. Suppose we’ll create a pricing table for a web hosting business. There are four pricing plans in the table. So, the column title will be Economy, Deluxe, Ultimate, et Maximum.
You can customize the title text and its background color from the respective tab on the right sidebar. You can also increase the text typography and its size.

Étape 3 : Ajouter les prix et les taux d'actualisation aux colonnes du tableau de tarification
First, add the prices of the plans to their respective columns. We have made the price texts bold, a bit bigger, and colorized with blue.

The discount rate usually sits very close to the main price. Place your cursor on the pricing cell and create space below them, pressing the Enter button on your keyboard.
After that, type your desired discount rates in the respective columns.

We will now highlight the discount rate so it becomes more visible. Select the discount rate text area with your cursor. Click the Plus d'options on the toolbar. Choose the Option de mise en évidence.

Use a background highlighter to the discount rate text. We have applied the color code #fcdc4b in the background of the discount rate on the pricing table.

Apply the same process to each column in respective areas.

If there are any special notes for the plans, you must specify them within the pricing area. See, we’ve done it using the first bracket sign.

Étape 4 : Ajouter des boutons CTA au tableau
By adding CTA buttons, you cannot provoke users to buy your products. Select the cell to which you want to add the CTA button. Press the Icône plus (+) on the cell and select the CTA button.

We’re not covering this part in full detail. All you have to do here is write a compelling CTA copy for each button. Link buttons to the checkout page. Add background and text colors for the buttons.

Étape 5 : Ajouter des caractéristiques au tableau des prix
Finally, you need to list all the features of your products and services based on their pricing plans. If there are any special words that you want to highlight, you can bold them.

Étape 6 : Prévisualisation du tableau des prix
Before you publish the pricing table, it’s better if you see it in the preview mode to check if there is any mistake. If the table is totally clean, you can make it live.

Conclusion
Thus, you can create informative pricing tables on your site that help customers make informed decisions. TableBerg is coming up with more new features by which you can create more advanced tables on your site.
If you love this post, comment below and let us know your feedback. Take a look at Comment créer un tableau comparatif dans WordPress.

