
について ワードプレス画像ブロック is super helpful when inserting and showcasing a single image on your website. But if you want to display multiple photos at once, the Gallery block is the right choice.
Therefore, you must learn how to use the gallery block in WordPress. Once you master the gallery block’s features, you can use it to enhance your website’s visuals, making it more professional and appealing.
このチュートリアルでは、WordPressのギャラリーブロック、ツールバーの機能、カスタマイズオプション、正しい使い方について説明します。最初から最後までお付き合いください。
WordPressギャラリーブロックとは何ですか?
WordPressのギャラリーブロック is a core block in the WordPress block editor. It lets you create and display a collection of images in a グリッド format. It is perfect for displaying event photos, organizing images into an attractive layout, or presenting images with minimal effort.
ブロックを使用すると、特定の機能が得られます。以下でその機能をチェックしてみよう。
- カスタマイズ:あなたのデザインに合わせてカラム、間隔、キャプションを調整します。ギャラリー内の個々の画像に異なる解像度を設定することもできます。
- レスポンシブデザイン:画像は、モバイル、タブレット、デスクトップでのシームレスな体験のために、異なる画面サイズに自動的に適応します。
- ビルトイン・インテグレーション:追加のプラグインは必要ありません。ブロックはWordPressでネイティブに動作します。
- SEOフレンドリー: Alt text and captions can improve your content’s accessibility and search engine ranking. You can also set ALT text for separate images within the gallery.
ギャラリーブロックのツールバー機能
ギャラリーブロックを挿入すると、ギャラリーをカスタマイズするための様々な機能を備えたツールバーがギャラリーブロックの上部に現れます。それらの機能は以下の通りです。
- 変身する: このブロックを画像、列、詳細、グループブロックに変換することができます。
- ドラッグだ: 専用ブロックをエディター内の任意の場所にドラッグ&ドロップすることができます。
- 移動ハンドル: ブロックを上下に動かすことができる。
- 整列する: alignオプションで画像の配置をNone、Wide Width、Full Width、Left、Center、Rightに設定できます。
- リンク このオプションでは、ブロック内の選択したコンテンツにリンクを追加することができます。
- キャプション 各画像のエディタオプションを使用してキャプションを追加できます。
- 加える: 追加オプションでは、ギャラリーに新しい画像を追加またはアップロードすることができます。
- その他のオプション 複製、コピー、グループ化など、ブロックのセクションに関連するオプションを提供します。

WordPressのギャラリーブロックの使い方
Using the Gallery block in WordPress is simple. Just follow the below steps:
ステップ1:エディターでギャラリーブロックを追加する
投稿またはページを開き、"+"アイコンをクリックしてブロックを追加し、"ギャラリー "を検索します。ギャラリーブロックを選択して、投稿またはページに挿入します。

ステップ2:画像のアップロード
画像をアップロードするか、メディアライブラリから画像を選択することができます。

アップロードオプションで画像を挿入する方法
画像ファイルを挿入するには、アップロードボタンをクリックします、 カーソルで画像を選択する 同時に CTRLボタン押しっぱなし をクリックする。これだけです。エディタに画像が表示されます。

メディアライブラリから画像を挿入する方法
メディアライブラリボタンをクリックし、画像を選択し、新規ギャラリーの作成とギャラリーの挿入ボタンをクリックしてエディターに画像を挿入します。

すべての画像をギャラリーに挿入すると、画像ブロックのすべてのツールバー機能を見ることができます。これらの機能を確認することができます これ.
ステップ3:ギャラリーのカスタマイズ
ギャラリーのカスタマイズについては 設定 (1) > ブロック (2) > 設定 (3). 列、解像度、その他のオプションを選択することができます。
- コラム カラムは、エディターに表示する画像の数を決定します。より多くのイメージを追加すればするほど、より多くのカラムがギャラリーに追加されます。 (4)
- 解決: 画像の解像度をサムネイルとフルサイズに設定できます。 (5)
- 画像のトリミング この機能は、すべての画像の比率を維持し、それらのサイズをフィットさせます。
- 順番をランダムにする: この機能はシリアルを維持せず、ランダムなシリアルで画像を表示する。

スタイル・オプションには以下のオプションがある。

- 色: カラーオプションでは、ギャラリーブロックの背景色を変更することができます。
- 寸法: 寸法オプションでは、ブロックの間隔(画像などの2つのブロック間のスペース)、マージン、パディングを変更できます。
- ボーダーと半径: この機能を使って、ギャラリーにボーダー、ボーダーカラー、ボーダー半径を追加することができます。
私が作成したギャラリーの完全なデモです。

Create an Interactive Gallery with Galleryberg
While the default Gallery block is excellent for simple grids, it lacks features such as a lightbox, hover effects, and diverse layouts.
If you want a more engaging gallery without writing code, the ギャラリーバーグ plugin is a free alternative that extends the block editor with extra tools. It lets you switch between tile, masonry, justified, and square layouts, and adds a built‑in lightbox for zooming and navigation.
Galleryberg also includes subtle hover effects and responsive controls so your galleries feel modern on desktop and mobile.
Now let’s see how to use the Galleryberg plugin.
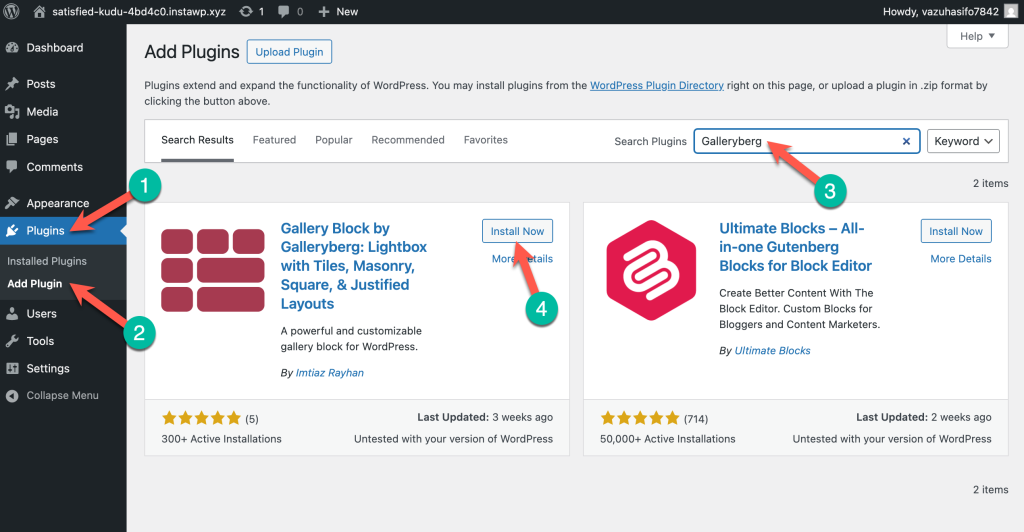
ステップ1:Gallerybergプラグインをインストールする
Go to your WordPress dashboard and navigate to Plugins → Add New and search for Galleryberg. Then install and activate the plugin.
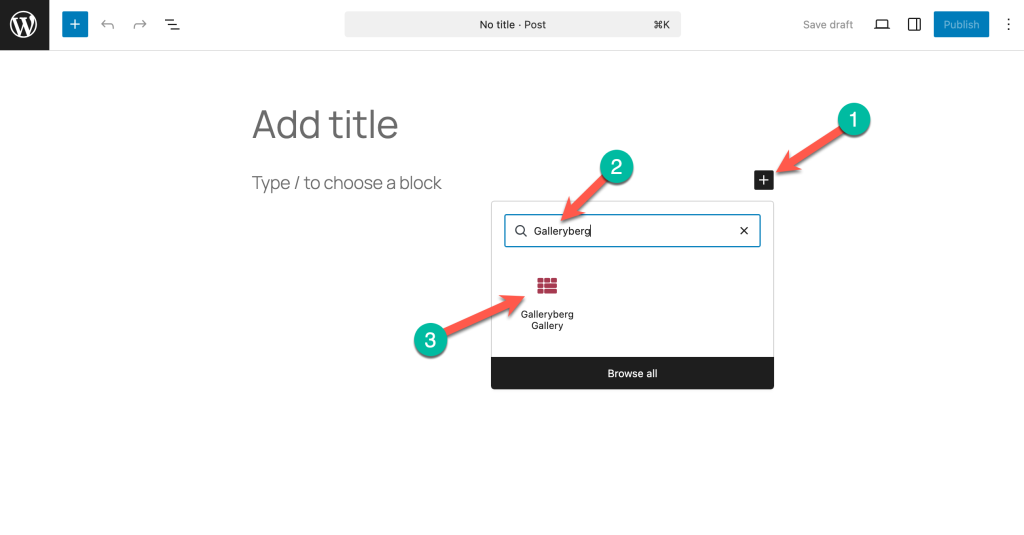
Step 2: Insert the Galleryberg Gallery Block
Create a new post/page or edit an existing one. Click the “+” button, search for Galleryberg, and add the block.
Step 3: Add Your Images
Upload new images or select them from the Media Library and click Select.
ステップ4:レイアウトの選択
By default, the block uses a Tiles layout. In the block’s sidebar, you can switch to 石工, ジャスティファイドあるいは 正方形 to better match your design.
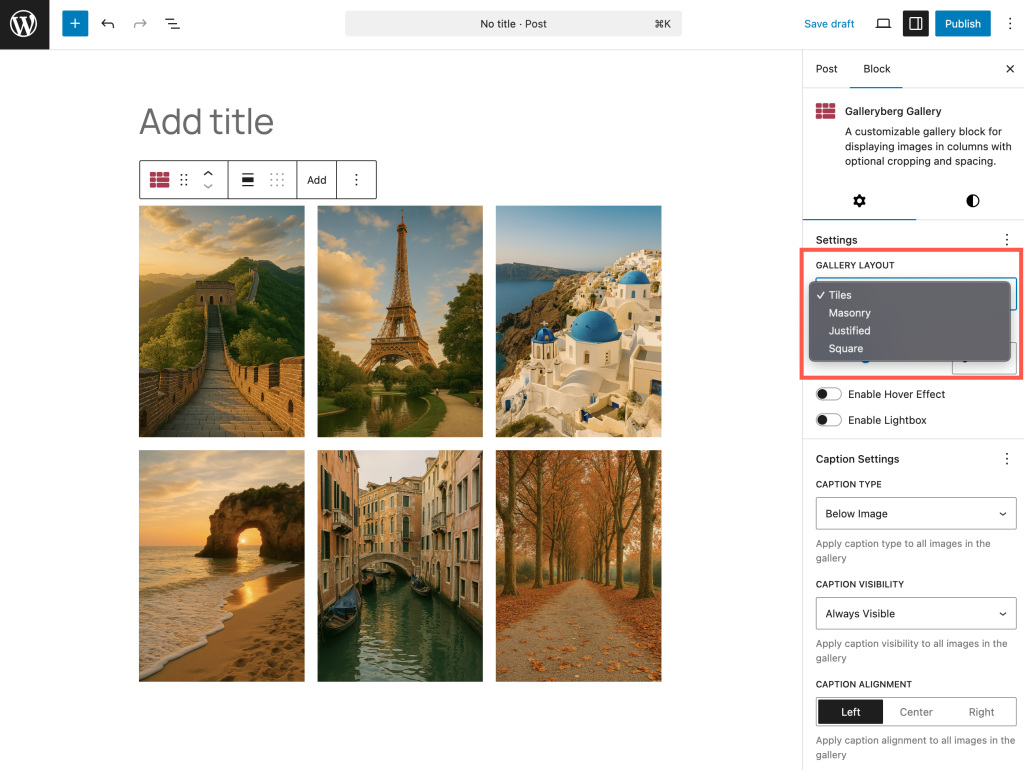
Each layout automatically rearranges the images, and you can adjust the columns, spacing, and borders.
Step 5: Enable the lightbox
Toggle Enable Lightbox in the block settings to let visitors click an image and view it in a pop‑up with zoom and slide navigation.
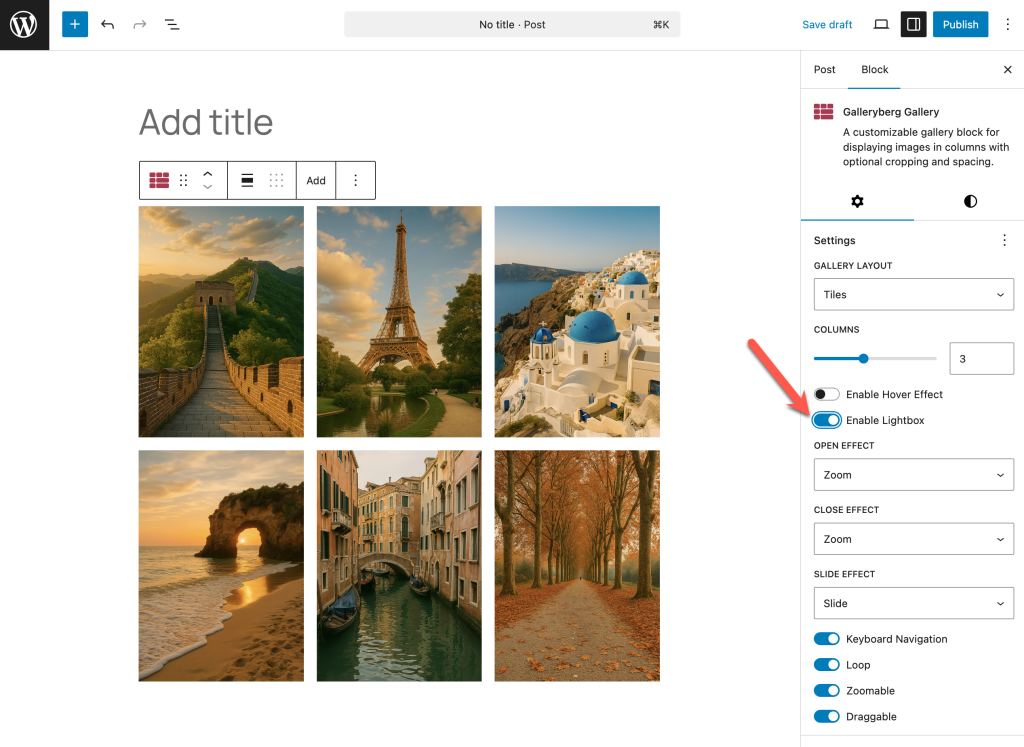
The lightbox includes keyboard and touch controls, so it works smoothly on desktops and phones.
Step 5: Explore hover effects and captions
Use the Caption settings to display text below images or as an overlay that appears on hover. Galleryberg’s hover animations (zoom in/out and overlays) make the gallery feel interactive without distracting the
ステップ6:プレビューと公開
Once satisfied, preview your gallery and publish or update the post. Your gallery will be responsive and performance‑optimised thanks to server‑side rendering.
Why Use Galleryberg Instead of the Core Block?
The core Gallery block offers basic grid layouts but lacks features such as a lightbox, hover animations, and varied layouts. Galleryberg provides four different gallery styles, a responsive lightbox with zoom and keyboard navigation, and intuitive controls for spacing, colors, and captions. It even supports responsive hover effects to add subtle animations. If you need a gallery that encourages visitors to interact with your images and fits seamlessly into the block editor, Galleryberg is a lightweight, user‑friendly solution.
最終的な感想
ギャラリーブロックは、Gutenbergブロックエディターによる強力なツールです。追加プラグインなしで画像コレクションを表示できます。
その柔軟性、カスタマイズオプション、WordPressとのシームレスな統合のために、すべての人にとって優れた選択肢です。
あなたのウェブサイトでの画像の見せ方がどのように変わるか、ぜひ試してみてください。
このチュートリアルについての感想を下のコメント欄で聞かせてください。また、あなたのソーシャルメディアを通じて仲間に知らせてください。
続きを読む

