
The WordPress Image block is super helpful when inserting and showcasing a single image on your website. But if you want to display multiple photos at once, the Gallery block is the right choice.
Therefore, you must learn how to use the gallery block in WordPress. Once you master the gallery block’s features, you can use it to enhance your website’s visuals, making it more professional and appealing.
Today, in this tutorial, we will discuss the WordPress gallery block, toolbar features, customization options, and how to use it properly. Make sure to follow us from start to finish.
What is the WordPress Gallery Block?
The WordPress Gallery block is a core block in the WordPress block editor. It lets you create and display a collection of images in a grid format. It is perfect for displaying event photos, organizing images into an attractive layout, or presenting images with minimal effort.
Certain features benefit you when you use the block. Check out those features below.
- Customization: Adjust columns, spacing, and captions to fit your design. You can also set different resolutions for individual images in the gallery.
- Responsive Design: Images adapt automatically to different screen sizes for a seamless experience on mobile, tablet, and desktop.
- Built-In Integration: No need for additional plugins; the block works natively in WordPress.
- SEO-Friendly: Alt text and captions can improve your content’s accessibility and search engine ranking. You can also set ALT text for separate images within the gallery.
Gallery Block’s Toolbar Features
When you insert the gallery block, a toolbar comes forth at the top of the gallery block with various features to customize your gallery. Those features are below.
- Transform: You can transform this block into an Image, Columns, Details, and Group block.
- Drag: Allows you to drag and drop the dedicated block into any place in the editor.
- Moving Handle: Let you move your block up and down.
- Align: The align option lets you set the image alignment to None, Wide Width, Full Width, Left, Center, and Right.
- Link: This option lets you add links for selected content within the block.
- Caption: You can add captions using the editor option for each image.
- Add: The add option allows you to add or upload new images into the gallery.
- More Options: Offers more options related to the section of the block, such as duplicate, copy, group, etc.

How to Use the Gallery Block in WordPress
Using the Gallery block in WordPress is simple. Just follow the below steps:
Step 1: Add Gallery Block in the Editor
Open the post or page, click the “+” icon to add a block, and search for “Gallery.” Select the Gallery Block to insert it into your post or page.

Step 2: Upload Your Images
You can either upload your images or select your images from the media library.

How to Insert Images Via Upload Option
To insert image files, click the upload button, select your images using your cursor while holding the CTRL button of your keyboard, and click open. That’s it. You can see your images in the editor.

How to Insert Image Via Media Library Option
Click the Media Library button, select your images, and click the Create a new Gallery and Insert Gallery button to insert the images into the editor.

When you’ve inserted all the images into the gallery, you can see all the toolbar features of the image block. You can check out those features here.
Step 3: Gallery Customization
For gallery customization, navigate to Settings (1) > Block (2) > Settings (3). You will find the options of selecting columns, resolution, and other options.
- Columns: Columns let you determine how many images you want to display in your editor. The more images you add, the more columns will be added to the Gallery. (4)
- Resolution: You can set the image resolution to Thumbnail and Full Size. (5)
- Crop Images to Fit: This feature maintains the ratio of every image and makes their size fit.
- Randomize Order: This feature does not maintain the serial but rather displays images at a random serial.

The Styles option features the following options.

- Color: The color option lets you change the background color of your Gallery block.
- Dimensions: The Dimensions option allows you to modify the Block spacing (space between two blocks such as images), margin, and padding.
- Border & Radius: Using this feature, you can add a border, border color, and border radius to your gallery.
Here is the full demo of the gallery that I’ve created.

Create an Interactive Gallery with Galleryberg
While the default Gallery block is excellent for simple grids, it lacks features such as a lightbox, hover effects, and diverse layouts.
If you want a more engaging gallery without writing code, the Galleryberg plugin is a free alternative that extends the block editor with extra tools. It lets you switch between tile, masonry, justified, and square layouts, and adds a built‑in lightbox for zooming and navigation.
Galleryberg also includes subtle hover effects and responsive controls so your galleries feel modern on desktop and mobile.
Now let’s see how to use the Galleryberg plugin.
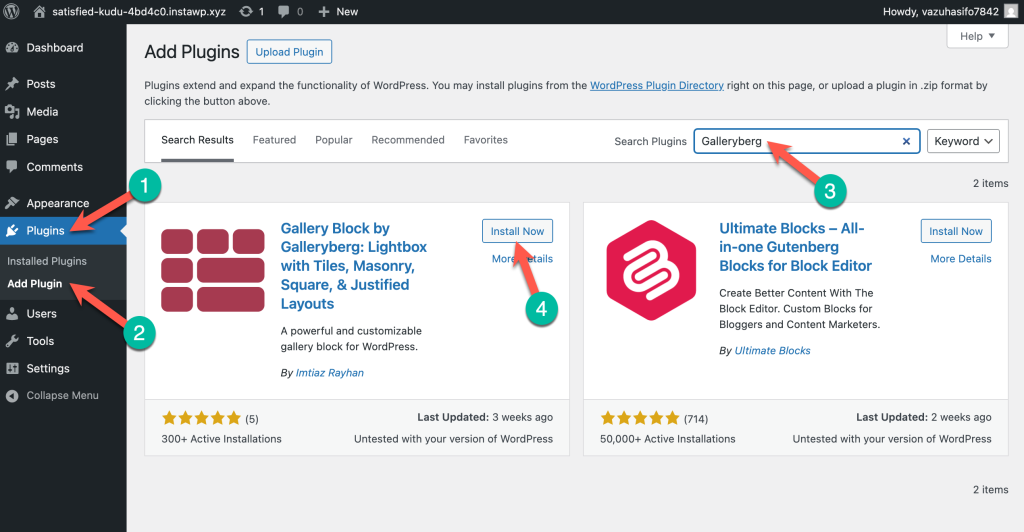
Step 1: Install the Galleryberg Plugin
Go to your WordPress dashboard and navigate to Plugins → Add New and search for Galleryberg. Then install and activate the plugin.
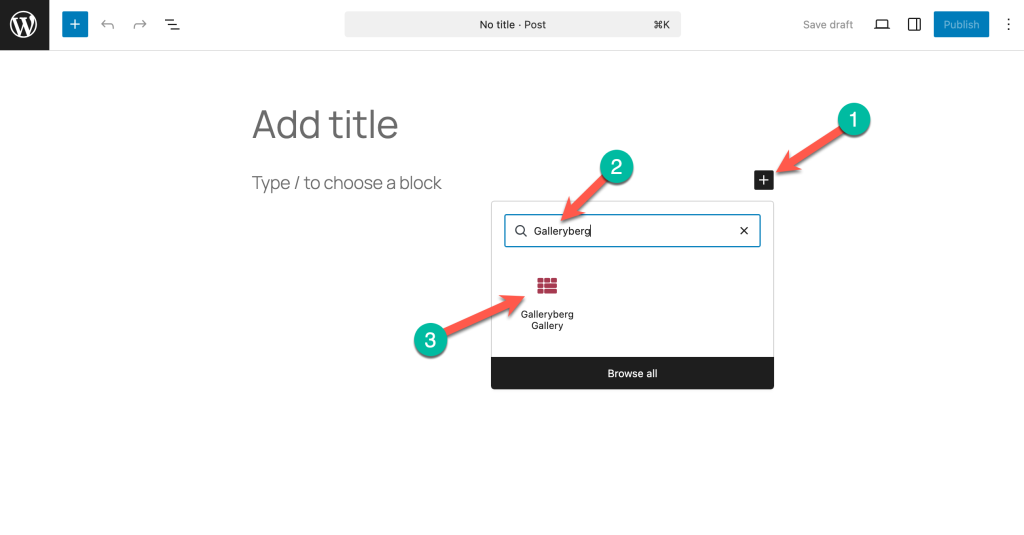
Step 2: Insert the Galleryberg Gallery Block
Create a new post/page or edit an existing one. Click the “+” button, search for Galleryberg, and add the block.
Step 3: Add Your Images
Upload new images or select them from the Media Library and click Select.
Step 4: Choose a Layout
By default, the block uses a Tiles layout. In the block’s sidebar, you can switch to Masonry, Justified, or Square to better match your design.
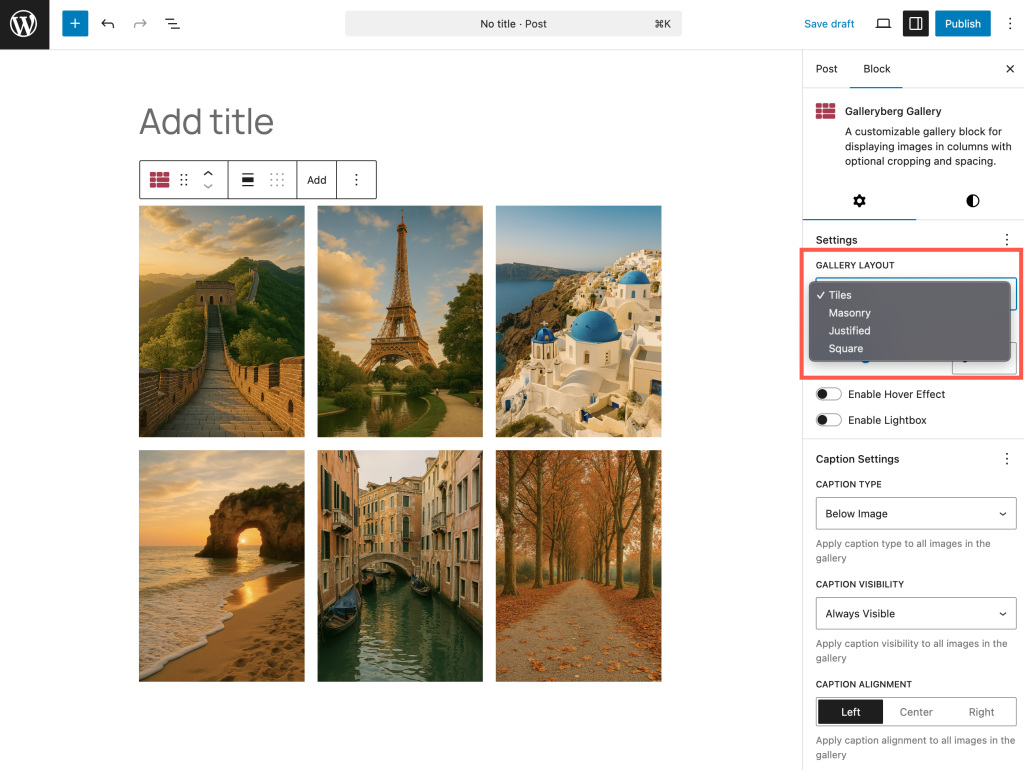
Each layout automatically rearranges the images, and you can adjust the columns, spacing, and borders.
Step 5: Enable the lightbox
Toggle Enable Lightbox in the block settings to let visitors click an image and view it in a pop‑up with zoom and slide navigation.
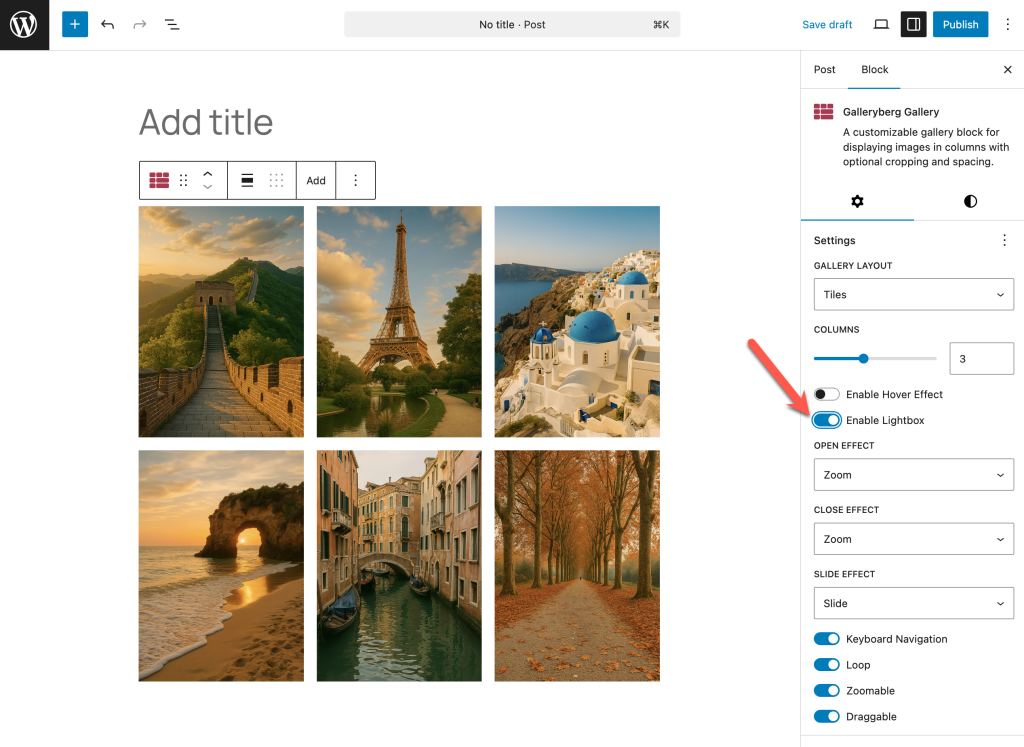
The lightbox includes keyboard and touch controls, so it works smoothly on desktops and phones.
Step 5: Explore hover effects and captions
Use the Caption settings to display text below images or as an overlay that appears on hover. Galleryberg’s hover animations (zoom in/out and overlays) make the gallery feel interactive without distracting the
Step 6: Preview and Publish
Once satisfied, preview your gallery and publish or update the post. Your gallery will be responsive and performance‑optimised thanks to server‑side rendering.
Why Use Galleryberg Instead of the Core Block?
The core Gallery block offers basic grid layouts but lacks features such as a lightbox, hover animations, and varied layouts. Galleryberg provides four different gallery styles, a responsive lightbox with zoom and keyboard navigation, and intuitive controls for spacing, colors, and captions. It even supports responsive hover effects to add subtle animations. If you need a gallery that encourages visitors to interact with your images and fits seamlessly into the block editor, Galleryberg is a lightweight, user‑friendly solution.
Final Thoughts!
The Gallery Block is a powerful tool with the Gutenberg block editor. It lets you display your image collections without any additional plugins.
It is an excellent choice for everyone for its flexibility, customization options, and seamless integration with WordPress.
Try it out and see how it can transform how you showcase images on your website.
Let me know your thoughts about the tutorial in the comment section below. Also, let your fellow people know about it through your social media platform.
Read More!

